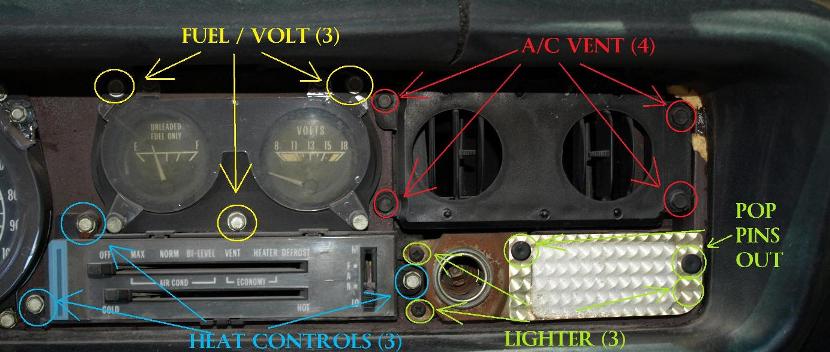
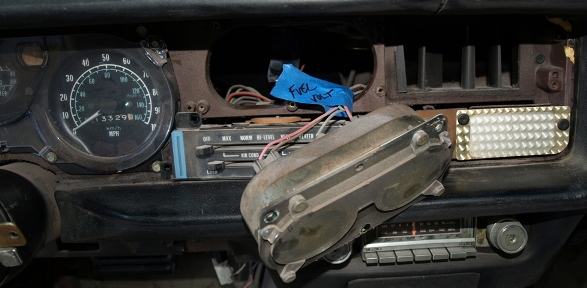
Hitman's Pontiac Trans Am Site
The Second Generation Trans Am Information Site

"Dash Removal"

Step by step on how to remove your dashboard.

"General Steps"

Here you will find the general steps to remove your dashboards in your Firebird or Trans Am. This proceedure shown was performed on a 1977 Special Edition Trans Am. Now this will cover all of the basics on removal, but there will be some differences from year to year. This page though will give you the general things on what to look for when removing your dash. Sometimes there might be a different location for the A/C vents or radio or gauges, but this should be able to at least point you in the right direction to get you going.

Things you need

As with any restoration project you tackle, it is always a good idea to have some things handy to make life easier. The first thing is a digital camera. With today's technology and prices, you can pick up one for pretty cheap. This will be used throughout the entire process taking photos of everything before you start, such as locations, screws, wires and more. That way when you go to put everything back together again you can refer back to the photos to make sure you are putting everything back in it's place. The second thing you want to invest in is alot of Zip-Lock baggies and a marker. So when removing nuts and botls and screws on a certain part, you can bag all the screws or whatever held it on and label it "Screws for thingy part". These two simnple items will help you out greatly in the long run. Sometimes you tackle projects in a day, sometimes you take months from the start of a project until you have the time to come back and complete it. So having everything bagged, labeled and photographed will make things that much easier.

Getting Started

Well, I have seen this come up time and time again and have also been asked in several emails about how to remove and replace your dash.  Over time, the dash in these Trans Ams crack and warp over time which is understandable for cars that are over 30 years old.  And now with some companies offering a replacement dash, I thought it was about time to put up a little page about how to remove and replace your worn out and cracked dash.

To remove your dash, it is only held in by four bolts, three screws, and three speednuts.  Sounds easy right... well it is, but it is getting all of the other stuff out of your way like the gauges and clusters that makes it a little bit more interesting.  On a scale of 1 to 10 for difficulty, I would rate this about a 7.  It really isn't all too difficult, just time consuming and tedious.  On the average, it will take you about 6 to 8 hours to do a complete dash change in your car.  On this page will not be an exact part by part instruction, but more of a general overview of the things that need to be done.  All cars are different depending on the year and also the options your car has such as A/C and deluxe light packages.  But hopefully this will give you enough of an idea to get you well on your way to changing out that dash.  To make life a little bit easier and give you more room to work with, I would suggest removing your center console and also your front seats to allow ample room for the change.  (If you need to read about how to remove your center console read here: Radio) You really don't need an expensive tools either to do the removal.  A couple of screwdrivers and a socket set is really all that is needed.  You will also need some other items like a box of Zip-Lock baggies, some masking tape, and a marker, and a digital camera if you have one.  If not, maybe invest in a few disposable cameras..... you will thank yourself later.

image

Where to start......

The first things you want to do is get some of the easy stuff out of your way to be able to get at all of the nuts, bolts, and screws that need to be removed. Located just under your steering column is a trim plate that is held on my two twist pins.

Remove those and that panel will drop out of the way. There is also a small cover plate or hush panel as some call it under the dash there on the drivers side which is held in by three screws. Remove those and that panel will drop. As you are removing these items you really should use that camera to take some snap shots of what you are taking off and where you are taking it off from to refer back to it at a later date if need be. Once removed, you need to put them in their own Zip-Lock baggies (the entire part and also any screws, nuts, or small brackets that held them in) and label them with a marker. The next thing you want to do is remove the ductwork from under the dash.

image

Air Ducts

In the diagram shown above, the three main lower air duct pieces are the ones that need to be removed. The three that are highlighted in yellow are attached at the back of the dash and will be removed when you remove the dash. The one highlighted in blue is the heater box and is attached to the firewall and does not need to be removed. Now, this is just an example of some duct work underneath the dash and may vary from year to year.

image

The duct piece located under the drivers side is held in there by a couple of screws. The center duct piece was held in by one bolt that was actually also part of the front bracket of the center console (which you already removed). The passenger side duct is held in by two screws in the front, two screws on the right side and one screw on top which is actually a bracket.

image

Once you remove all of the screws, your duct work will basically drop onto the floor. If you start to pull on the duct work and it does not come down, DO NOT force it. These are brittle after 30 years and will break easy. Take a look around the duct where you think it is hanging up and check for any screws you might have missed.

image

Glove Box

Now that you have the air duct work out of the way, it is time to move back up and start taking apart your glovebox to get it out of the way.

image

To get the glove box door and glovebox out of the way, there are two screws that hold the hinge to the side of the door. Remove those to allow the door to drop down all the way. Next, remove the four screws that hold on the glovebox door. If your car is equipped with the power trunk release, you will need to unplug that from the back when you remove the glovebox door. Make sure you use the masking tape to wrap the plug and label it. Now you can remove the six screws that hold in the glovebox insert and pull it out. You have to watch at the top to get around the light in there which is held in by one screw. You can remove that as long as you are here. Now you have access to get at alot of the duct work and the back of the radio and also some of the gauge cluster. The next thing you want to do is drop that steering column out of your way.

image

Steering Column and Dash Bezel

There are four bolts and two nuts that need to be removed. The four bolts hold on the dash brace that you need to get out of your way. Remember how I told you above that the dash is held in by four bolts, three screws and three speednuts.... well, you just removed two of those bolts. Then there are two nuts that hold the steering column up. Remove those and let your steering column drop down. You may want to put something under it to support it, but it is not necessary. Now you can move on to removing that dash bezel. You do not have to remove any of the trim rings except for the one that surrounds the lighter. This screws off and needs to be removed in order to remove the dash bezel. Once you remove that, there are five screws that hold the dash bezel in place..... three on top, and two underneath.

image
image

The three on top you will probably have to use a short screwdriver to get at them, but they are easy to see at least. The two underneath are long screws that go up into the base of the dash bezel. Once all of the screws are out, you will be able to pull the dash bezel out from the top and lean it towards you to get it all the way out. Now, you should have a clear view of all of the gauges and accessories behind that bezel. Again, you should be putting all of these parts and screws in separate baggies and labeling them for putting them back in once you get to that point. You can either start from the left or from the right it really does not matter. I always start from the left and work my way across because of the ease of getting to the plugs behind the gauges.

image

Vents and gauges

Now from this vantage point you should be able to see all of the gauges and all of the screws that hold them in. You can remove your two center vents by the four screws and it comes right out. The small dash bezel block off plate is held in by two push pins and need to be popped out in order to get at the last screw holding in the lighter (and defroster if you have one). Remove the three screws for the lighter and pull it out so you can get at the plugs in the back. When you pull the plugs off, get that masking tape ready. You'll want to wrap a piece of tape around the wirers for the plugs you just removed and label them. Now, you can do a couple of things here.... you can wrap all three of the plugs together and mark them or mark them individually like Fuel/Volt Left and Fuel/Volt Right, but most of the plugs on the back of each gauge are different. Like on the back of the fuel/volt gauge, one plug is shaped like a "V", one is a light bulb, and the other is shaped like an "L". But either way, you need to mark these wires as you remove them. Again, taking photos is also helpful.

image

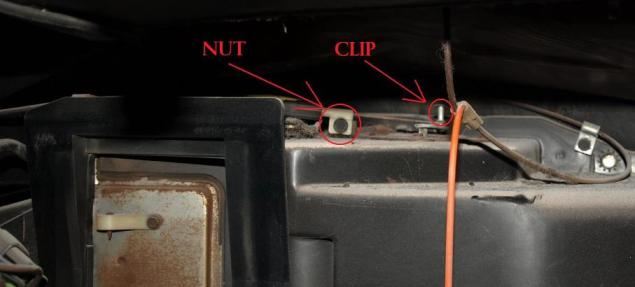
The next thing you want to get out of your way is the heater control unit. Remove the three screws that hold it in and it will slide out a little. Remove the large plug at the top and also the plug on the right and label them accordingly. The next two things you have to remove is the heater door cable and also the vacuum lines. The heater control cable is held to the top heater box by a screw and a clip. The clip holds the loop at the end of the cable to the door post and then is held in place by a screw.

image

Once those two are free, you are able to slide out the heater control unit a little more to be able to remove the vacuum lines. Some people remove all of the vacuum lines and then plug them back in when done. Make sure you make a diagram if you do this. You can also remove the whole unit by removing the screw on the right hand side. Once that screw is removed, you can rotate and swing out the vacuum module to remove it without having to remove and of the vacuum lines themselves.

image
image

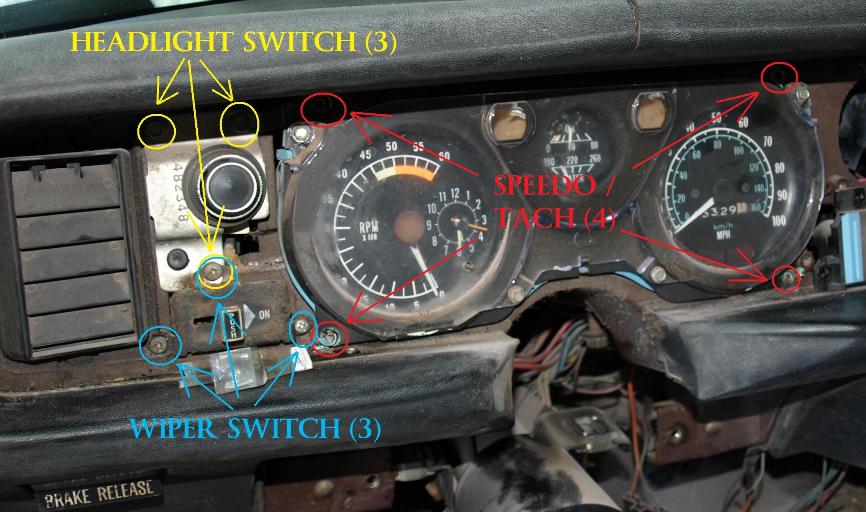
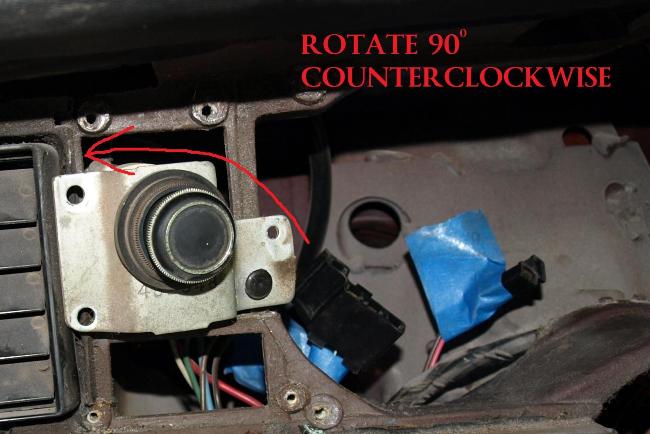
The next thing to remove would be the speedometer and tachometer cluster. You can reach around the back, or come up from underneath and disconnect the speedometer cable. It is held in place by a push clip. Push it in and the cable will pop out. You can now remove the screws that hold in the cluster and slide it out. Unplug the cables in the back and again labels them accordingly. The large central plug has a clip at the top and bottom that need to be depressed to un-hook it from the gauge cluster. For the large plug you may also want to put a "T" at the top and a "B" at the bottom of the large plug to make sure you put it back the right way. Now you can work on removing the headlight switch and the wiper switch. You can reach in again from the side and unplug the wiper switch and label the plugs. The headlight switch unplugs from the bottom. Once you remove the screws, you need to rotate the headlight switch 90 degrees counterclockwise to slide it out.

image

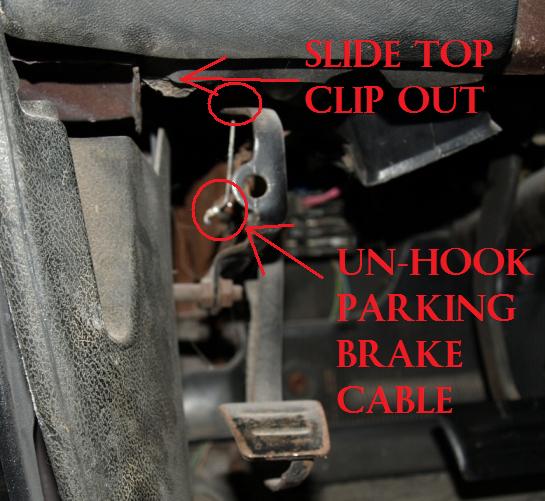
Ok, now we have pretty much removed everything we need to to be able to access everything we need to remove the dash. There are a few more things that need to be done in order to totally remove the dash. You need to unhook the parking brake release cable from the parking brake itself. You can use a set of needle nose pliers to un-hook the cable and then slide the top clip out to release the cable entirely.

image

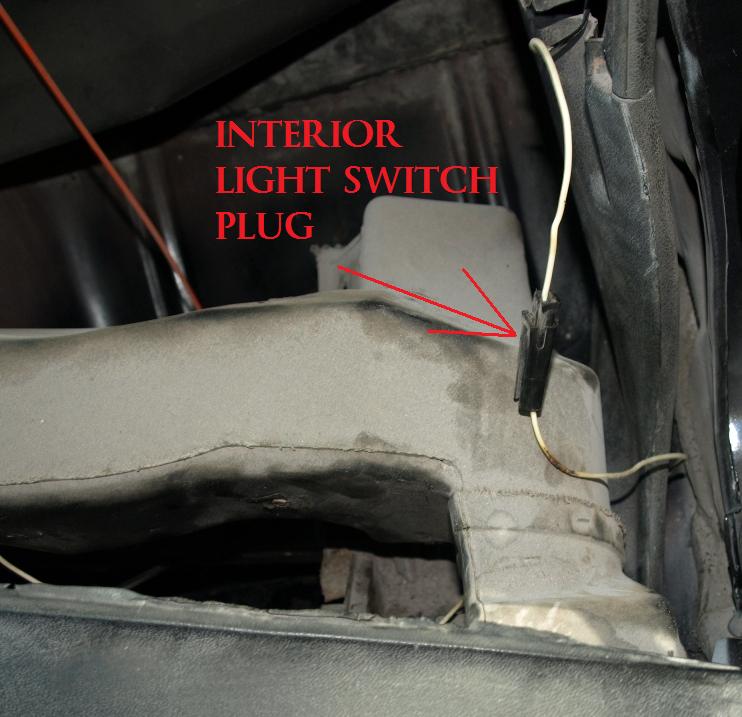
Now depending on your interior and what options you have there are anywhere between 3 to 5 wires left that need to be unplugged before you remove your dash. The 3 wires left would be one ground wire which is attached by a screw to the lower metal dash support on the drivers side located under the parking brake release handle, and two wires and plugs which are the two switches for the doors which turn on your interior lights when the door are open. Remove the ground wire and unplug the two interior light switches (one on the passenger side and one on the drivers side).

image

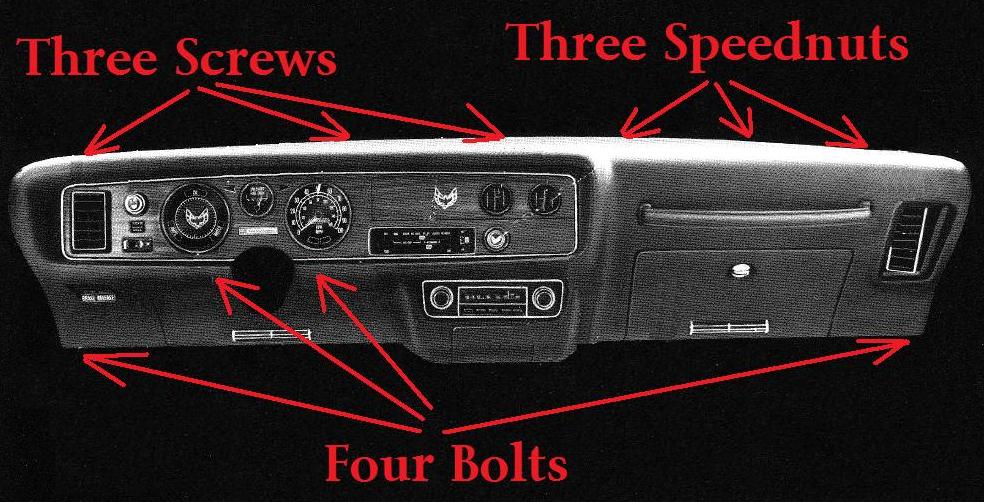
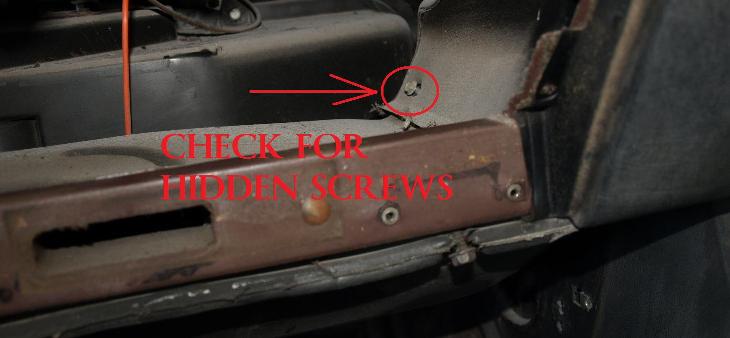
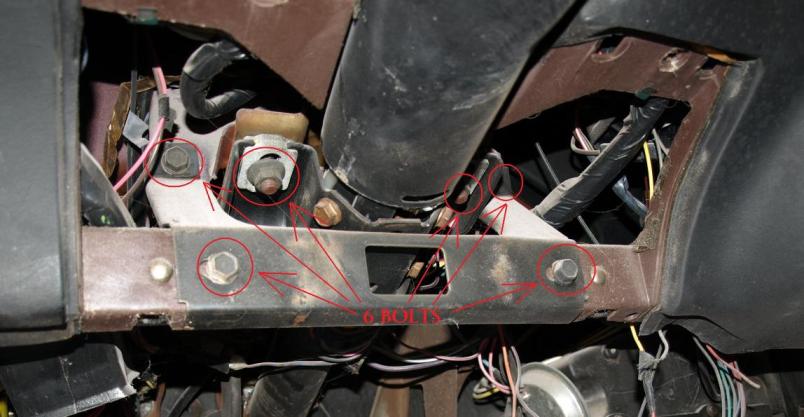
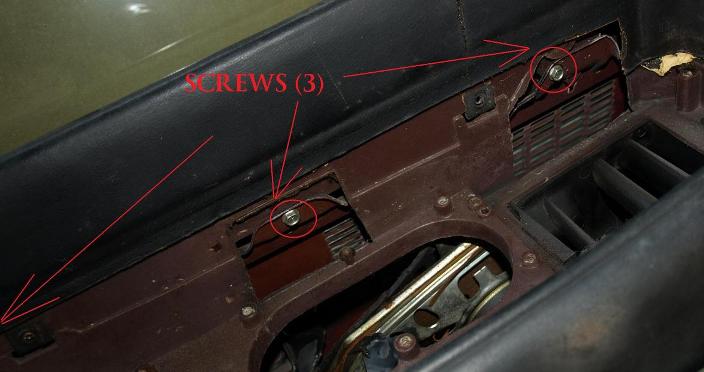
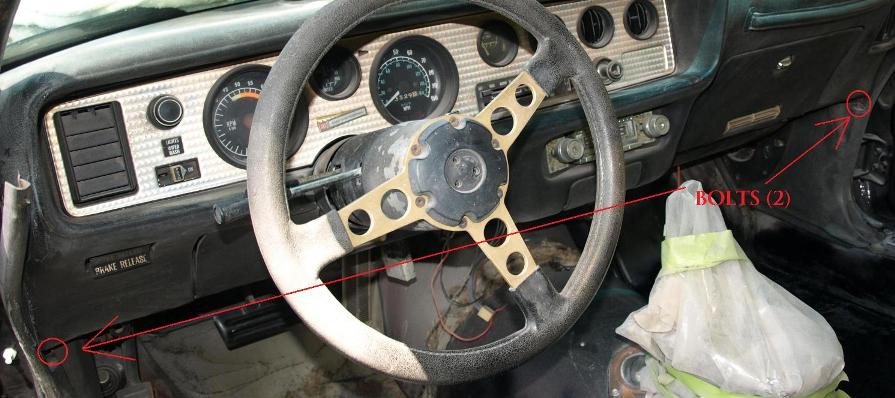
Now, if you have the deluxe lamp group as part of your interior options, there are two lights that are under the dash that need to be removed as well. They are held in each by one screw. Remove those screws from the underside to detach the lights from the dash. Ok, now everything you need is disconnected from the dash and it is time to remove the 3 screws, three speednuts and the last two remaining bolts that hold the dash in. The first two item to remove would be the two bolts located at the bottom two outside lower corners of the dash. They are on the bottom of the dash located right next to both kick panels. Once you remove those, you can pull gently on the lower section of the dash to free it from those points.

image

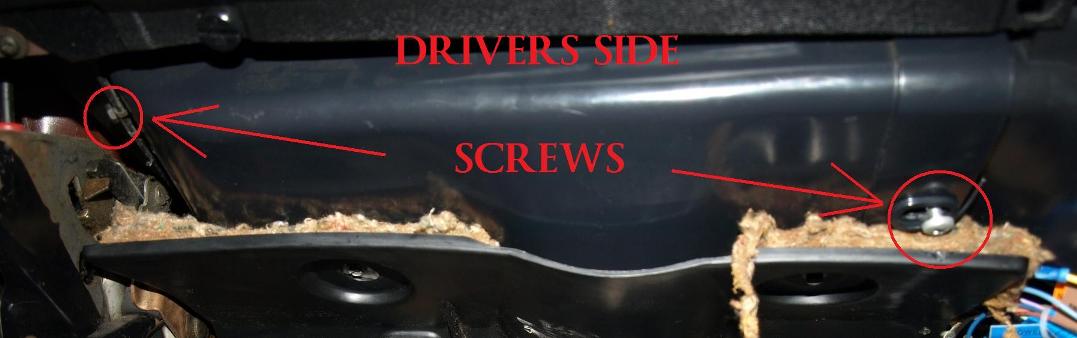
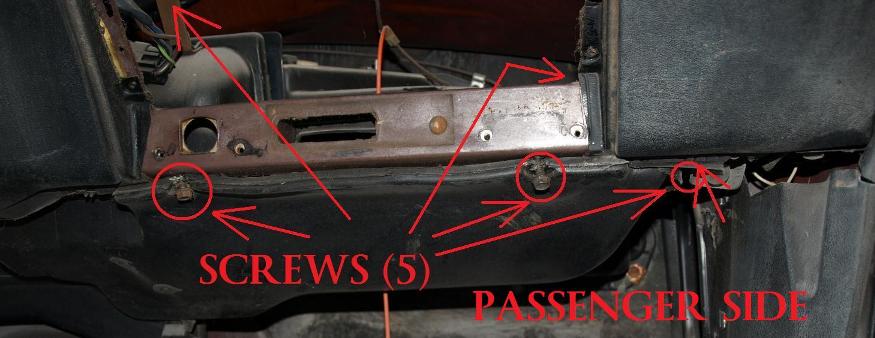
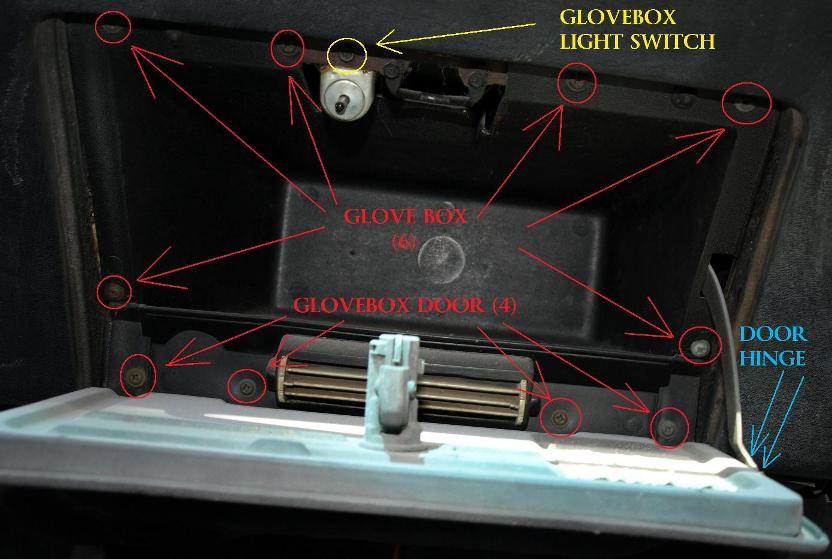
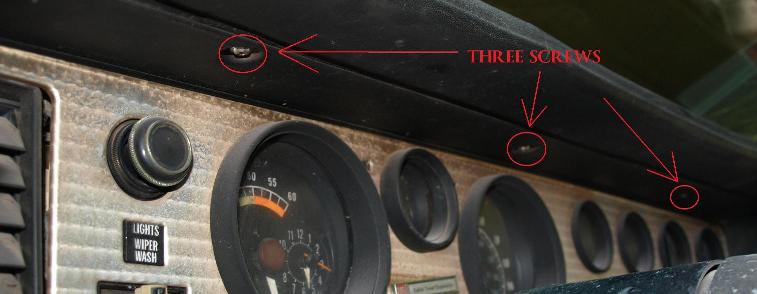
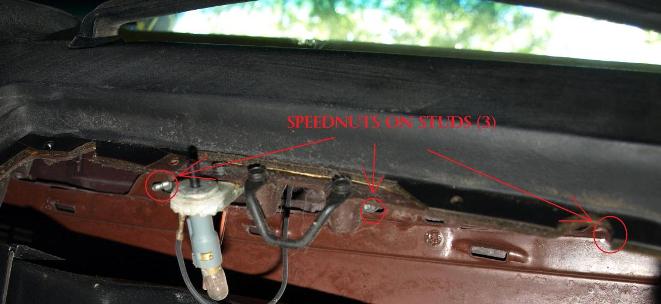
The next thing you want to remove are all of the screws along the top rail of the dash. There are three screws located along the top drivers side of the dash that hold it to the metal dash panel. You have to lay down on your back and look up to be able to see them. On the passenger side, if you look up through the glovebox opening, you will be able to see the three speednuts located on studs that are attached to the dash itself.

image
image

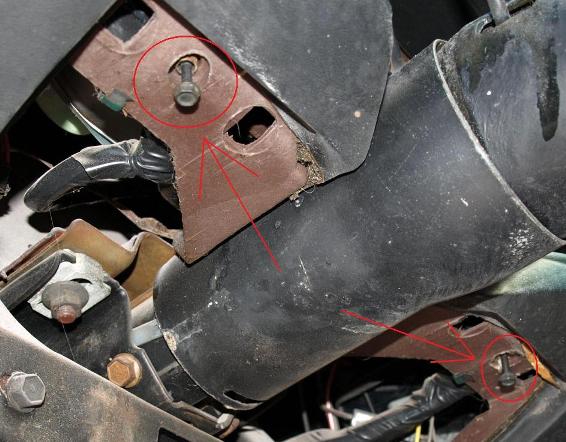
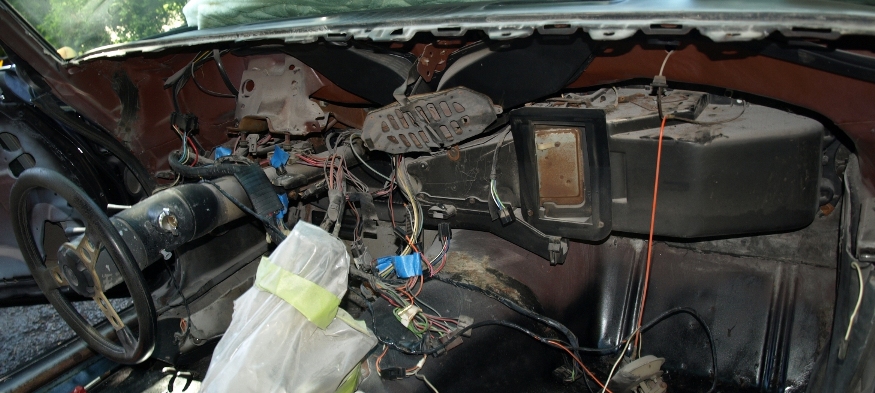
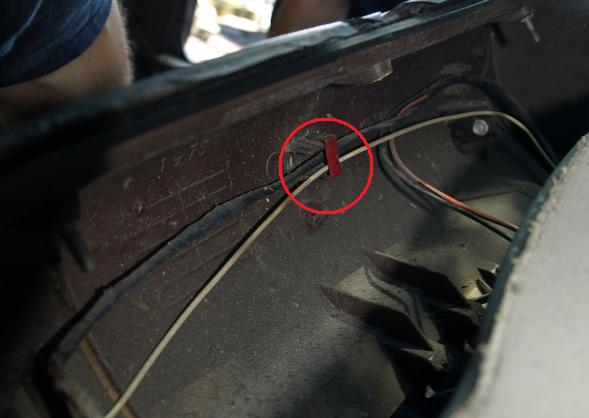
Ok, now that everything is removed that holds the dash in, you can lift up on the dash and pull it towards you to to expose the last few steps in taking your dash out of the car. The only thing that is left is removing all of the wiring harness that is clipped into the back of the dash (like the one shown in the photo below). They are located all along the back of the dash. It would be best to save all of the clips and also use the masking tape again to put a small tape line on what part of the harness attaches to what part of the dash.

image

Now the dash is totally free and can be removed from the car entirely. Since everything is out of the car, now would also be a good time to clean up behind the dash from the 30 years of dust that has probably accumulated back there. Also, if you have any plans to make any changes like putting in a new front speaker or changing out your heater core, now also would be a good time since it is all free and accessible. It would also be easy to put a new coat of paint on your steering column if that is chipped or faded.

image

Once you have the dash out of the car, you can remove the remaining items from the dash to install on your new dash. If you have the deluxe interior and have the grab handle located on your dash, it is held in the back by two screws. Remove the two screws and also the metal retaining clips that they were screwed to and transfer it over to the new dash.

image

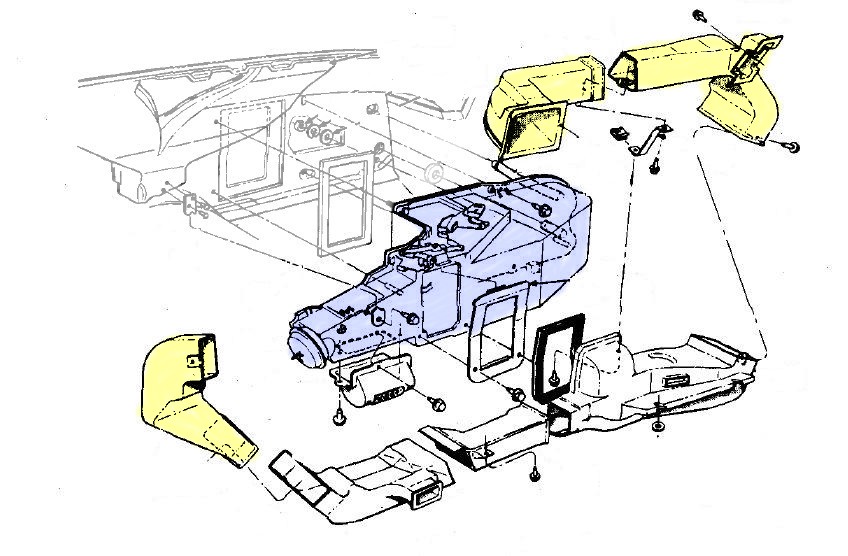
Remove the three remaining dash vents and duct work from the back side of the dash (the three that were highlighted in yellow in the diagram above). The center vent is actually held in by a screw located on the front face of the dash and then slides out. You will also need to transfer over the two outside vents located in the dash itself. They are simply held in by clips that pop off and then the vents slide out. The last thing would be the parking brake release handle itself. It is held on the back by a large "C" clip. Remove that clip and slide the parking brake release handle out of the front of the dash. Transfer all of these items to your new dash and reverse the process above to install the new dash into the car.

Any Questions?